DownHammock Version 2
Synthetic insulated hammocks have a problem because the insulation comes in sheets, which makes it harder for the material to conform to my body without compressing some of it. But unlike Primaloft, down naturally conforms to its container. So if the undercover is the right size, and I fill it with the right amount of down, it'll naturally loft up against the bottom of the hammock all along my body. My first DownHammock was good enough to prove the concept but still had some issues. Mainly that the material was too light the first time so I had to add another layer, which added to the weight. And I was laying on the baffle seams, which I thought would wear over time and cause the baffles to separate. I'm satisfied that version 1 proved the concept of a down hammock, though - so I started planning v2 to get the weight down.
So I made a plan that would remove the baffle seams from the hammock body, which would alleviate most of the problems if I use heavier material for the body. Then I went to the Hot Springs Hammock Campout (22-24 Sep) and saw Risk's version that doesn't have any baffles at all, and decided to give it a try. I changed the dimensions a bit but it's basically a copy. My biggest concern is whether or not it will keep my shoulders warm. Risk said he just pushes the down up if his shoulders get cool. I'll test it...I can always make one with baffles if this doesn't work.
The cutting and sewing for this one took about an hour and a half. Transfering the down took a LONG time, though - not sure how long b/c we went to dinner in the middle of it, but probably ~3 hours just doing the down. I figured out a way to do it faster towards the end, though - it's on the Stuffing Down page. If I had started that way, I probably could have done it in about an hour...guessing 3-4 hours for the whole project from start to finish.
Details:
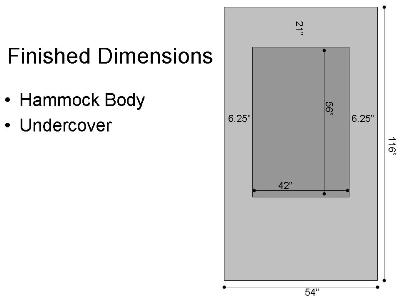
- I cut a piece of 1.9 oz untreated ripstop nylon to 118"x56" for the hammock body. It weighs 10 oz (284 g). Then I used a straight stitch to put a rolled hem around the perimeter.
- I cut a piece of 1.1 oz DWR ripstop to 50"x66" for the undercover. It weighs 3-1/8 oz (90 g).
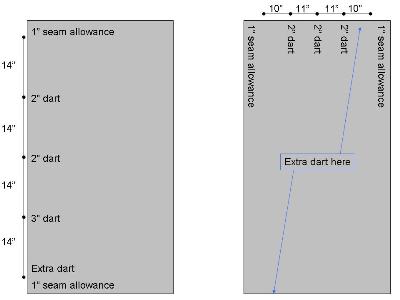
- I put the darts into the undercover. Down the long sides, I gave a ~1" seam allowance, then put a dart every 14". (See pic below) I put one extra dart with whatever extra material was left over. (Measurements aren't exact b/c I didn't use the whole 1" seam allowance at top or bottom, and I cut with an extra inch than I needed. I just planned to gather whatever was left into the dart. It doesn't have to be perfect!)
- Same deal for the darts on the short sides. 1" seam allowance, three 2" darts spaced at 10" or 11" (see pic). I put an extra dart with whatever extra material was left.
- I marked a rectangle on the hammock body for where the undercover will be sewn. I measured the empty space from the outside instead of trying to center a rectangle on there. The insulation starts 21" down from the head end, and I have ~6-1/4" of uninsulated space down the sides.
- Pin the undercover in place.
- Sew around the perimeter of the undercover. I used a zig-zag stitch with 3 length and 2.5 width.
- I started at the point with the least stress and ran one continuous seam. Backstitching creates a weak spot so I minimized it by only backstitching at the head end, on the side where I rarely lay (above my right shoulder as I'm laying in the hammock). I left a ~6" opening to put the down in.
- I whipped the hammock's ends and hung it up to make sure the undercover's dimensions would work, and the down wouldn't be compressed. Looks like it'll be fine.
- I used a ShopVac to transfer the down from the first DownHammock to this one. I ended up with exactly 6 oz of Ed Speer's 900fp down in this one (leaving 6 oz in v1, too).
- Then I sewed the final opening shut and hung it up.
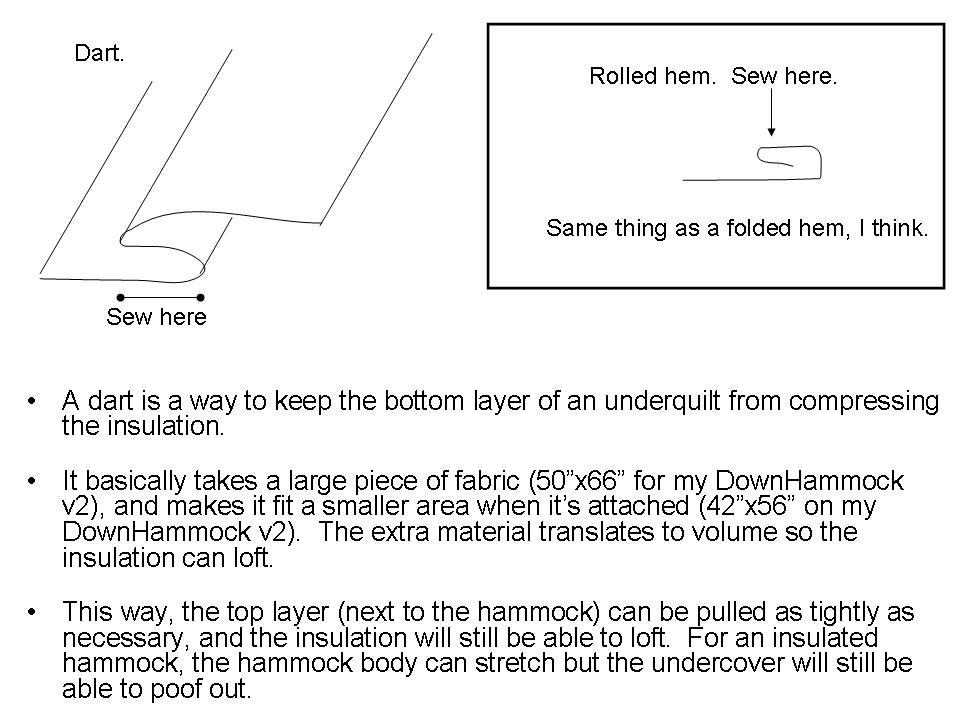
And check out this picture for a quick explanation of darts and rolled hems.
| Component | Weight |
Whipping, Thread |
|
| Total Weight (w/o supports) |
19-1/4 oz (544 g) |
 |
Undercover - Darts go into all four sides of the undercover. The extra darts on the long sides go under my butt. On the short sides, I put the extra dart under where I'll lay when I'm diagonal. |
 |
Measure along the outside to make sure you place the undercover in the right position. If you just lay it on the body and pin it down, it'll already be stretched when you lay on the hammock.
The insulated section covers from my head to my knees. I'm already carrying a CCF sit pad (about 20" square) or a torso pad (about 20"x52") so I figured I'll use that for my foot insulation since condensation isn't an issue down there. I'll see how easy it is to keep the pad in position - I might put grosgrain loops on the hammock's sides to hold the pad in place...probably add only ~4 g to the weight. |
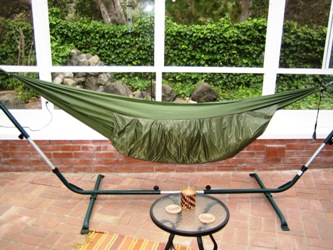 |
It's olive drab, which I like. Now I need some OD silnylon for hammock skins and I'll be all set.
When the Crazy Creek test is done, I'm gonna use those buckles, some 1" webbing, and some spectra for the supports. I may be able to get a bit lighter but those buckles are so convenient - I can adjust or center the hammock from underneath the tarp if it's raining, and it only takes one wrap around the tree. Very quick, too - and very little weight penalty. |
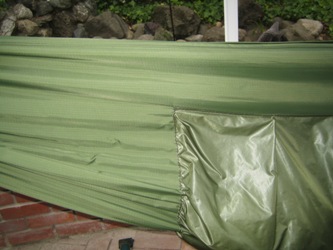 |
Close-up of the foot end. |
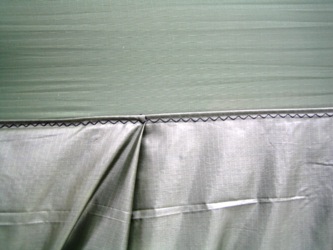 |
Detail of a dart. See this pic for how to make a dart. |
 |
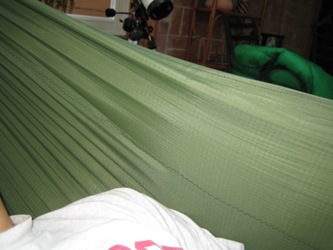
Inside hammock, head end, right shoulder. This is the backstitching, and the gap where I put the down inside. |
 |
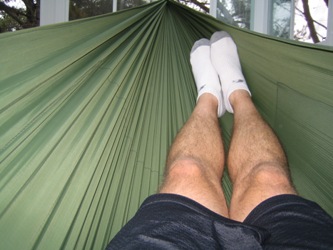
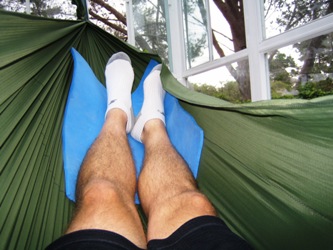
Plenty of coverage for my shoulders. This is the closest side since I'm laying on a slight diagonal. |
 |
The insulation goes down to about my knees. If I curl up on my side, only one foot is off the insulation. |
 |
Since I'm already carrying it, my sit pad provides foot insulation. |
 |
This bag holds the DownHammock v2, JRB Nest, Air Core supports, and homemade tree huggers. And it's just stuffed in there...it could probably compress to at least 2/3 of this size, but I don't like to compress my down more than necessary. |
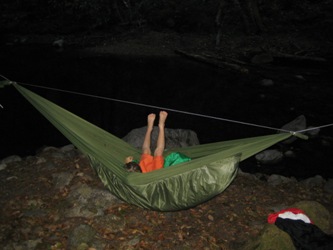
| First Test - 2 Oct 06 | |
Pretty good results. It kept me toasty at 54 F and light winds last night. I slept in nylon shorts, a cotton T-shirt and running socks, and used a JRB Nest as a top quilt. Some thoughts:
| |
| Update - 9 Oct 06 | |
| I've slept in the hammock a few times now, and last night I went to Little Sur River and slept with a low of 47F. It works and I've stayed warm, but sometimes I have to push the down up towards my shoulders during the night. Makes me lean more towards adding the baffles but I'll keep testing before I make up my mind.
I tried it for a while w/o the foot pad, too - it worked until about 55F or so, then I needed the pad under my feet. I can actually get my whole body on the insulated section if I curl up on my side so it's not a big deal if I don't have the pad.
| |